
When your garage door isn’t working right, the problem often lies in a worn-out spring. Garage door springs are key to keeping the door balanced, helping it open and close smoothly. Without a properly functioning spring, you may struggle with a stuck or difficult-to-move door. While tackling garage door repair can seem daunting, this guide will walk you through how to replace a garage door spring safely.
We’ll break down the process, from understanding the differences between torsion and extension springs to using the right tools for the job. You can handle this repair and save money with patience and attention to detail. But remember, if you’re unsure or uncomfortable, it’s always wise to contact a professional garage door repair service to ensure everything is done safely and correctly.
Signs that Your Garage Door Spring Needs Replacement
Before embarking on the replacement process, it’s essential to recognize the signs that your garage door spring needs attention. Keep an eye out for these common warning signs:
- Greater difficulty when trying to open or close the garage door
- Uneven or jerky movement of the door as it opens and closes
- The door appears to be heavier or more challenging to lift manually
- Visible signs of wear, such as rust, cracks, or excessive stretching of the spring
- Sudden, unexpected door drops or closures
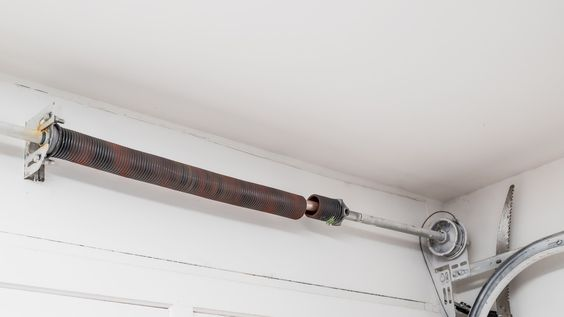
Types of Garage Door Springs
Garage door springs come in two primary varieties: torsion and extension springs. Each type serves a specific purpose and requires a slightly different replacement process.
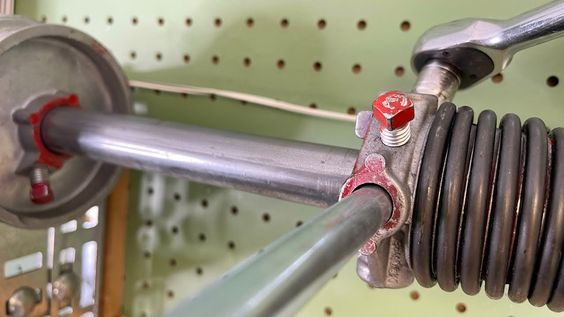
Torsion Springs
- Mounted above the garage door
- Provide the majority of the counterbalancing force
- Typically more durable and longer-lasting than extension springs
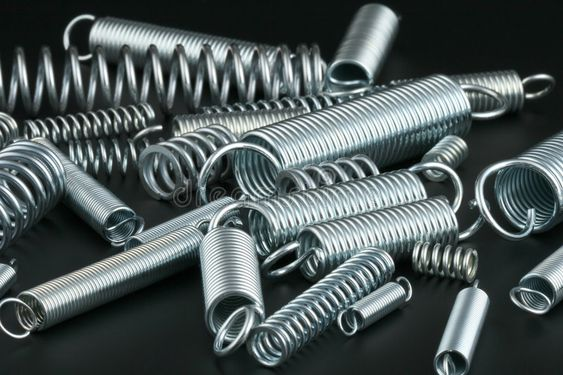
Extension Springs
- Attached to both sides of the garage door
- Provide supplementary counterbalancing force
- It may require additional safety cables for added security
Tools and Equipment Needed for Replacing a Garage Door Spring
Before beginning the replacement process, ensure you have the following tools and equipment on hand:
- Winding bars (also known as winding rods or winding cones)
- Adjustable wrench or socket set
- Pliers or vice grips
- Ladder or step stool
- Gloves and safety glasses
- Replacement garage door spring(s) (ensure the correct size and type)
Safety Tips Before Starting the Replacement Process
Replacing a garage door spring can be hazardous if proper safety measures are not taken. Before beginning, it’s crucial to:
- Disconnect the garage door opener or disengage the automatic opener mechanism to prevent unintended operation.
- Ensure the garage door is in the fully closed position and securely locked in place.
- Wear proper protective gear, like gloves and safety glasses, to protect yourself from potential injuries.
- Clear the work area of any obstructions or debris to maintain a safe, uncluttered workspace.
- Familiarize yourself with the replacement process and any specific safety instructions the spring manufacturer provides.
Simple Steps on How to Replace a Garage Door Spring
Identify the Type of Garage Door Spring
- Examine your existing garage door spring to determine whether it is a torsion spring or an extension spring.
- Measure the spring’s diameter, length, and number of winds to ensure you purchase the correct replacement.
Disconnect the Garage Door
- Disconnect the garage door from the opener or disengage the automatic opener mechanism.
- Manually raise the door to the fully open position and secure it using C-clamps or vice grips.
Release the Spring Tension
For torsion springs:
- Insert the winding bars into the spring winding cone and carefully unwind the spring by turning it counterclockwise.
- Continue unwinding the spring until all the tension is released.
For extension springs:
- Carefully disconnect the spring from the pulleys or brackets on either side of the door.
Remove the Old Spring
- Torsion springs: Carefully slide the spring off the center shaft or bearing plate.
- Extension springs: Detach the spring from the anchor points on the door frame.
Install the New Spring
- Torsion springs: Slide the new spring onto the center shaft or bearing plate, ensuring it is appropriately aligned.
- Extension springs: Attach the new spring to the anchor points on the door frame.
Tension the New Spring
For torsion springs:
- Insert the winding bars into the spring winding cone and carefully wind the spring clockwise to the proper tension.
- Check the manufacturer’s guidelines or seek advice from a professional to find the accurate number of turns needed.
For extension springs:
- Attach the spring to the pulleys or brackets on either side of the door and adjust the tension as needed.
Reconnect the Garage Door
- Reattach the garage door to the opener or reconnect the automatic opener mechanism.
- Test the door’s operation by manually opening and closing it several times to ensure smooth, balanced movement.
Adjust the Spring Tension (if necessary)
- If the door does not operate smoothly or appears unbalanced, make minor adjustments to the spring tension until the desired performance is achieved.
Secure the Safety Cables (for extension springs)
- If your garage door uses extension springs, ensure the safety cables are correctly installed and secured to prevent the springs from causing damage or injury if they fail.
Clean Up and Dispose of the Old Spring
- Properly dispose of the old spring according to local regulations.
- Make sure to clear away any debris or tools used after the replacement process.
Avoid These Mistakes When Replacing Your Garage Door Springs
To ensure a successful and safe garage door spring replacement, it’s essential to be aware of the common errors that can occur:
Incorrect Spring Identification
Knowing whether your garage door uses a torsion or extension spring can help you buy the correct part. Using the wrong spring can cause more damage and make repairs more expensive. Always check the spring type before replacing it to ensure your garage door functions correctly.
Improper Winding/Tensioning
Winding or tensioning a garage door spring incorrectly can make the door unbalanced or, worse, cause the spring to fail. If the tension is wrong, the door might be hard to open or close, which could lead to safety hazards. Proper tensioning is crucial for smooth operation.
Inadequate Safety Precautions
Skipping essential safety steps, like disconnecting the garage door opener or securing the door, can lead to injuries. Always take proper safety precautions when replacing garage door springs to avoid accidents. A slight mistake can result in serious harm.
Incorrect Spring Placement
If you place the spring incorrectly on the center shaft, pulleys, or anchor points, your garage door won’t work correctly. Incorrect placement can cause uneven movement, making it hard to open or close the door and leading to further damage.
Failure to Adjust Properly
Adjusting the tension properly after installing a new garage door spring is essential. Without the proper adjustment, your door may still have problems like uneven movement or difficulty opening. Correctly adjusting the spring ensures the garage door operates smoothly and avoids further issues.
Garage Door Spring Replacement: Testing and Adjusting Tips
After completing the spring replacement, it’s essential to thoroughly test the garage door’s operation and make any necessary adjustments to ensure it is functioning correctly.
Test the Door’s Operation
- Manually open and close the door several times, observing for smooth, balanced movement.
- Ensure the door opens and closes quickly without any binding or jerky motion.
Adjust the Spring Tension (if necessary)
- If the door appears unbalanced or challenging to operate, make minor adjustments to the spring tension.
- For torsion springs, add or remove winding turns as needed.
- Adjust the anchor points or spring length for extension springs to achieve the desired tension.
Verify the Safety Features
- Ensure cables or other safety features are installed and functioning correctly.
- Test the door’s auto-reverse mechanism (if applicable) to ensure it operates as intended.
Observe the Door’s Performance Over Time
- Monitor the door’s operation over the next few days or weeks to ensure the replacement was successful.
- If issues arise, such as uneven movement or increased difficulty in opening/closing, make further adjustments or consult a professional.
How to Maintain Garage Door Springs for a Longer Lifespan
To ensure the longevity of your garage door springs and prevent the need for future replacements, it’s essential to implement a regular garage door maintenance routine. Here are some tips to help prolong the life of your garage door springs:
Lubricate the Springs Regularly
- Apply a high-quality garage door lubricant to the springs every 6-12 months.
- This helps to reduce friction and prevent premature wear and tear.
Inspect the Springs Periodically
- Inspect the springs for signs of wear, such as rust, cracks, or excessive stretching.
- If any issues are detected, have a professional inspect and replace the springs as needed.
Avoid Overloading the Garage Door
- Ensure the door does not carry excessive weight, such as heavy storage items.
- Overloading the door can place undue stress on the springs and shorten their lifespan.
Balance the Door Properly
- Maintain the proper balance of the garage door by adjusting the spring tension as needed.
- An imbalanced door can lead to premature spring failure.
Prevent Exposure to Harsh Elements
- Protect the springs from excessive moisture, direct sunlight, and other environmental factors that can accelerate wear and corrosion.
FAQs: Steps and Tips for Replacing Garage Door Springs
Can I replace my garage door springs myself?
You might be able to replace garage door springs independently, but it’s not recommended unless you have the right experience. These springs are under a lot of tension and can be very dangerous if mishandled. A mistake could lead to injury or damage. Hiring a garage door repair installer is best to ensure the job is done safely and correctly.
How long do garage door springs last?
Garage door springs typically last between 7 and 12 years, depending on how often the door is used. Springs are rated for about 10,000 cycles, meaning one complete door opening and closing. Regular maintenance can help extend their life, but eventually, the springs will wear out and need replacing.
Can a garage door work with one spring?
If your garage door has two springs, it’s not safe to use it with only one working spring. Operating the door with just one spring puts extra strain on the system, which can lead to damage and even danger. To keep your garage door working smoothly, replacing both springs simultaneously is best.
What causes a spring to break on a garage door?
A garage door spring can break due to normal wear and tear, rust, or poor maintenance. Over time, the spring loses tension and eventually reaches its cycle limit. Rust and lack of lubrication can speed up this process, causing the spring to break sooner than expected.
How much should a garage door spring replacement cost?
Replacing a garage door spring generally costs between $150 and $350, depending on the spring type and where you live. As the springs are under high tension, hiring a garage door repair near you to replace them is essential. Be sure to get a few quotes to compare prices and find the best deal.
Conclusion
Dealing with a broken spring can feel overwhelming, but it doesn’t have to be. Regarding garage door repair, proper steps can make a big difference. By following this guide on replacing a garage door spring, you can save money and gain the confidence to fix future problems. However, if you’re unsure, it’s always a brilliant idea to call a professional to ensure the job is done safely.
The garage door spring is a key part of how your garage door works. It helps keep the door balanced and moving smoothly. Replacing it might seem tricky, but with the right tools and a simple step-by-step approach, it’s a task you can handle on your own. Remember, safety comes first—take your time and follow the instructions carefully to avoid accidents.
If you ever need more help, contact a trusted garage door repair company like Ryder Garage Doors. We specialize in spring replacement and other garage door repairs, ensuring your garage door works perfectly. Don’t let repairs stress you out—contact us today, and let our experts take care of everything so your door runs smoothly again!
End Note
Regarding dependable garage door repair services, Ryder Garage Doors is here. Whether you need a quick spring repair or a complete garage door installation, we have the experience to do the job right. We proudly serve Centralia, WA, and nearby areas, offering fast and reliable service that keeps your garage door working smoothly.
If you want to see our work, check out our gallery to see the garage doors that have been installed and repaired. Follow us on Facebook, Instagram, and YouTube for tips, updates, and ideas. You can also learn more about our team and why we love what we do on our About Us page.
If you’re ready to upgrade or repair your garage door, don’t wait! Contact Us today for a free estimate. Be sure to visit our blog for helpful tips, and explore our services page to see how we can help keep your garage door in great shape. From minor fixes to big projects, we’ve got you covered!


