Garage door sensors play a crucial role in ensuring the safety and security of your home. These devices are designed to prevent the door from closing when an object, person, or pet is present in its path, thereby avoiding potential accidents or injuries. Proper wiring of these sensors is essential for their efficient operation and your family’s well-being.
In today’s world, where convenience and security are paramount, garage door sensors have become an indispensable part of modern homes. Not only do they provide peace of mind, but they also add an extra layer of protection against unwanted intrusions or accidents. By following a step-by-step guide for garage door sensor wiring, you can ensure that your home is safeguarded while enjoying the convenience of automated garage door operation.
Garage door sensor wiring basics
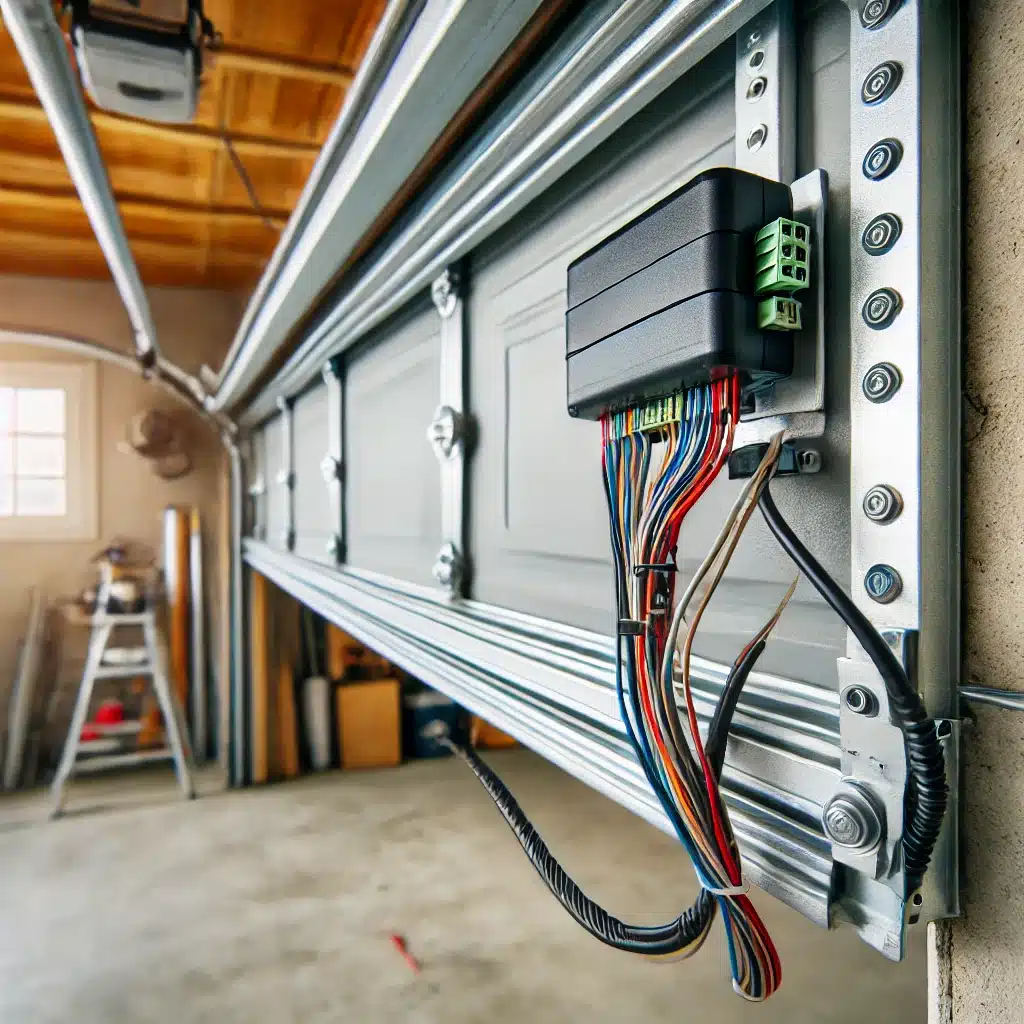
Before delving into the wiring process, it’s essential to understand the basic components involved in garage door sensor wiring. Typically, a new garage door sensor system consists of two main parts: the transmitter and the receiver. The transmitter emits an invisible beam of light, which is detected by the receiver on the opposite side. When this beam is interrupted, the sensors signal the garage door opener to reverse or stop its movement, preventing potential accidents.
The wiring for these sensors involves connecting them to the garage door opener unit, which serves as the control center. Proper wiring ensures that the sensors communicate effectively with the opener, allowing for seamless operation and reliable safety measures.
Tools and materials needed for garage door sensor wiring
To ensure a smooth and successful wiring process, you’ll need to gather the following tools and materials:
- Garage door sensor kit (including transmitter, receiver, and wiring)
- Wire strippers
- Pliers
- Screwdrivers (flathead and Phillips head)
- Drill (if mounting brackets need to be installed)
- Ladder or step stool
- Electrical tape
- Wire nuts or connectors
- Safety glasses
- Pencil or marker for marking positions
Having these tools and materials readily available will streamline the wiring process and ensure a professional installation.
Step-by-step guide for garage door sensor wiring
Follow these step-by-step instructions to wire your garage door sensors effectively:
- Locate the appropriate mounting positions: Identify the optimal locations for mounting the transmitter and receiver sensors. These positions should be on opposite sides of the garage door opening, typically at a height of 6 inches above the floor. Mark the positions with a pencil or marker.
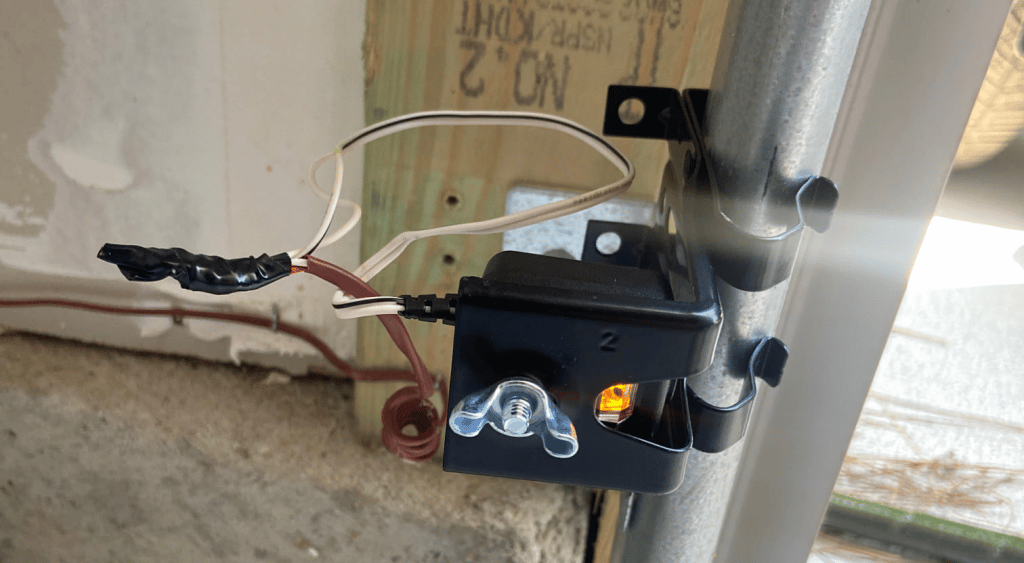
- Mount the sensor brackets: Use the provided brackets to securely mount the transmitter and receiver sensors at the marked positions. Ensure that the sensors are level and aligned with each other.
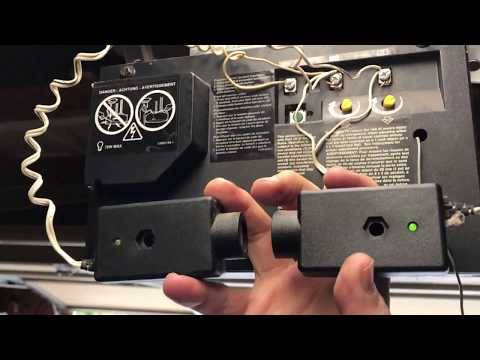
- Connect the wires to the sensors: Each sensor will have wires protruding from it. Connect the wires to the corresponding terminals on the sensors, following the manufacturer’s instructions or color-coding guide.
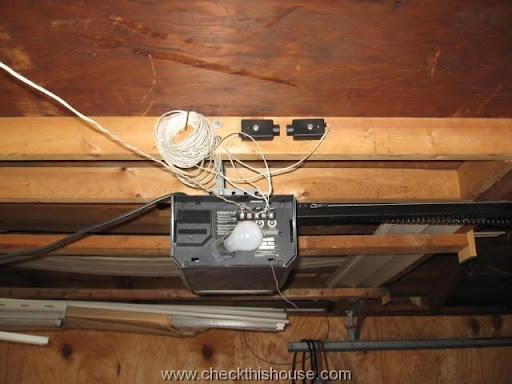
- Route the wires to the garage door opener: Carefully route the wires from the sensors to the garage door opener unit. You may need to drill small holes in the wall or use wire clips to secure the wires in place.
- Connect the wires to the garage door opener: Locate the terminals or ports on the garage door opener unit designated for the sensor wiring. Follow the manufacturer’s instructions to connect the wires from the sensors to the appropriate terminals.
- Secure the wiring: Use wire clips or electrical tape to secure the wiring in place, ensuring that it is neat and tidy.
- Test the sensor operation: Once the wiring is complete, test the operation of the sensors by placing an object in the path of the invisible beam. The garage door should reverse or stop its movement when the beam is interrupted.
Remember, it’s always advisable to consult the manufacturer’s instructions for your specific garage door opener and sensor models, as the wiring process may vary slightly.
Testing and troubleshooting garage door sensor wiring
After completing the wiring process, it’s crucial to test the functionality of the garage door sensors. Here are some steps to follow:
- Visual inspection: Perform a visual inspection of the wiring to ensure that all connections are secure and properly insulated.
- Operational test: With the garage door closed, place an object in the path of the sensor beam. The door should refuse to close or reverse its direction if it is in the process of closing.
- Alignment check: If the sensors are not functioning correctly, check their alignment. Ensure that the transmitter and receiver are directly facing each other and that there are no obstructions in the path of the beam.
- Wire continuity test: Use a multimeter to check for continuity in the wiring, ensuring that there are no breaks or disconnections.
- Power source verification: Verify that the sensors are receiving power from the garage door opener unit by checking the voltage at the sensor terminals.
If you encounter any issues during the testing or troubleshooting process, consult the manufacturer’s manual or seek professional assistance from a qualified technician.
Important safety precautions for garage door sensor installation
Safety should be your top priority when working with garage door sensors and wiring. Here are some important safety precautions to keep in mind:
- Disconnect power: Before starting any wiring or installation work, disconnect the power supply to the garage door opener unit to prevent electrical shocks or accidental activation.
- Wear protective gear: Wear safety glasses and gloves to protect your eyes and hands during the installation process.
- Use proper tools: Ensure that you have the appropriate tools for the job and that they are in good working condition.
- Follow manufacturer’s instructions: Carefully read and follow the manufacturer’s instructions for your specific garage door opener and sensor models.
- Secure ladders or step stools: If you need to use a ladder or step stool, ensure that it is stable and secure before climbing on it.
- Keep children and pets away: Keep children and pets away from the work area to prevent potential accidents or injuries.
Remember, safety should always come first when working with electrical components and garage door systems.
Benefits of properly wired garage door sensors
Investing time and effort into properly wiring your garage door sensors offers numerous benefits, including:
- Increased safety: Well-functioning sensors prevent the garage door from closing on objects, people, or pets, reducing the risk of accidents and injuries.
- Peace of mind: Knowing that your garage door sensors are properly wired and functioning correctly provides peace of mind and a sense of security.
- Compliance with regulations: Many local building codes and regulations require the installation of garage door sensors for safety purposes. Proper wiring ensures compliance with these regulations.
- Potential insurance discounts: Some insurance companies offer discounts for homes with properly installed and maintained safety features, such as garage door sensors.
- Convenience: Properly wired sensors allow for smooth and seamless operation of your garage door, adding convenience to your daily routine.
By prioritizing the proper wiring of your garage door sensors, you not only enhance the safety and security of your home but also enjoy the added benefits of peace of mind, regulatory compliance, and potential cost savings.
Common issues with garage door sensor wiring and how to fix them
Even with careful installation, issues with garage door sensor wiring can sometimes arise. Here are some common problems and their potential solutions:
- Misaligned sensors: If the transmitter and receiver are not properly aligned, the sensor beam may be obstructed, causing the door to malfunction. Adjust the sensor positions until they are directly facing each other and the beam is unobstructed.
- Damaged or loose wiring: Over time, wires can become damaged or loose, leading to connectivity issues. Inspect the wiring for any signs of damage or loose connections, and replace or secure the wires as needed.
- Interference from other devices: Certain electronic devices or appliances can interfere with the sensor beam, causing it to malfunction. Identify and relocate any potential sources of interference away from the sensor path.
- Power supply issues: If the sensors are not receiving adequate power from the garage door opener unit, they may not function correctly. Check the power supply connections and ensure that the sensors are receiving the correct voltage.
- Sensor malfunction: In some cases, the sensors themselves may be faulty or damaged, requiring replacement. If all other troubleshooting steps fail, consider replacing the sensor units with new ones.
By addressing these common issues promptly, you can ensure that your garage door sensor wiring remains in optimal condition, providing reliable and efficient operation for years to come.
FAQs
Can I wire the garage door sensors myself, or do I need professional help?
While it is possible to wire the sensors yourself if you have basic electrical knowledge and follow the instructions carefully, it is generally recommended to seek professional assistance, especially if you are unsure or lack experience with electrical wiring. This ensures a safe and proper installation, reducing the risk of potential issues or accidents.
How often should I test and maintain my garage door sensors?
It is recommended to test your garage door sensors at least once a month to ensure they are functioning correctly. Additionally, perform a visual inspection of the wiring and sensor alignment periodically to identify any potential issues or needed adjustments.
Can I use the same wiring for replacement sensors?
Yes, in most cases, you can reuse the existing wiring when replacing garage door sensors. However, it is essential to inspect the wiring for any signs of damage or wear and replace it if necessary.
What should I do if my garage door sensors are not working after wiring?
If your garage door sensors are not working after wiring, follow these steps: 1) Check the sensor alignment and ensure there are no obstructions in the beam path, 2) Inspect the wiring for any loose connections or damage, 3) Verify that the sensors are receiving power from the garage door opener unit, and 4) Consult the manufacturer’s instructions or seek professional assistance if the issue persists.
Can garage door sensor wiring be done without drilling holes in the walls?
Yes, it is possible to wire garage door sensors without drilling holes in the walls. You can route the wiring along the floor or ceiling and use wire clips or conduits to secure the wires in place. However, this method may not be as aesthetically pleasing and can potentially create tripping hazards if not done properly.
Conclusion
Efficient garage door sensor wiring is essential for ensuring the safety and security of your home. By following the step-by-step guide outlined in this article, you can confidently wire your garage door sensors and enjoy the peace of mind that comes with a properly functioning system.
Remember to prioritize safety throughout the installation process and to regularly test and maintain your sensors to ensure their continued effectiveness. With proper wiring and maintenance, your garage door repair sensors will provide a reliable barrier against potential accidents and unwanted intrusions, allowing you to enjoy the convenience of automated garage door operation with confidence.
If you’re in need of professional assistance with garage door sensor wiring or any other garage door-related services, don’t hesitate to contact our team of experts. We offer reliable and affordable solutions to ensure the safety and convenience of your home. Visit our website or give us a call today to schedule an appointment or request a free consultation.
End Note
Explore more about Ryder Garage Doors and discover why homeowners across Vancouver, WA trust them for their garage door needs. Visit their About Us page to learn about their commitment to quality and customer satisfaction. Whether you need installation, repair, or maintenance, Ryder Garage Doors offers a wide range of expert services tailored to meet your needs. Dive deeper into their service offerings on their Services page and see how they can enhance your home’s curb appeal and functionality.
For a glimpse into their craftsmanship, browse through their gallery showcasing stunning transformations. Ready to get started? Contact Ryder Garage Doors today via their contact page and schedule a consultation with their friendly team. Wherever you are in Vancouver, WA, Ryder Garage Doors is dedicated to delivering superior service and exceeding your expectations. Stay informed with their latest updates and tips on garage door maintenance by checking out their insightful blog. Don’t miss out on enhancing your home with Ryder Garage Doors – your trusted partner in garage door solutions.
Let us know if you need any adjustments or further assistance!