Garage door springs are essential for the smooth operation and safety of your garage door. Knowing how to replace a spring on a garage door is crucial for maintaining its functionality and preventing potential hazards. These springs bear the weight of the door, making it easy to open and close.
There are two main types of garage door springs: torsion springs, which are mounted above the door and used in modern systems, and extension springs, found on either side of the door in older systems. Recognizing the type of spring you have is the first step in the replacement process.
Due to the high tension in these springs, handling them requires proper knowledge and tools. Regular maintenance and timely replacement are key to avoiding unexpected failures and ensuring the longevity of your garage door system.
This guide will provide you with the essential steps and safety precautions needed to replace a garage door spring safely and efficiently. If at any point you feel unsure, it’s best to consult a professional.
By understanding how to replace a spring on a garage door, you can keep your garage door reliable and secure, ensuring peace of mind and uninterrupted access to your garage. Read on for a detailed guide on this important maintenance task.
Types of Garage Door Springs
Understanding the types of garage door springs is essential for effectively replacing and maintaining them. Garage doors typically use either torsion springs or extension springs, each with its unique features and applications. Here’s a detailed look at both types:
Torsion Springs
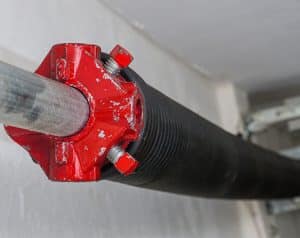
Torsion springs are the most commonly used type in modern garage doors. They are mounted horizontally above the garage door opening on a metal shaft. These springs work by twisting and storing mechanical energy when the door is lowered and releasing it when the door is raised.
Advantages:
- Durability: Torsion springs are known for their strength and durability, often lasting between 15,000 to 20,000 cycles (one cycle is one full opening and closing of the door).
- Smooth Operation: They provide a more controlled and smoother door movement, reducing wear and tear on other components of the garage door system.
- Safety: Torsion springs are safer to use because they are less likely to break unexpectedly compared to extension springs. When they do break, they tend to remain on the shaft, minimizing potential damage and injury.
Applications:
- Residential Garage Doors: Torsion springs are ideal for residential garage doors, especially for heavier and wider doors that require balanced lifting.
- Commercial Garage Doors: They are also suitable for commercial and industrial garage doors due to their robust design and ability to handle frequent use.
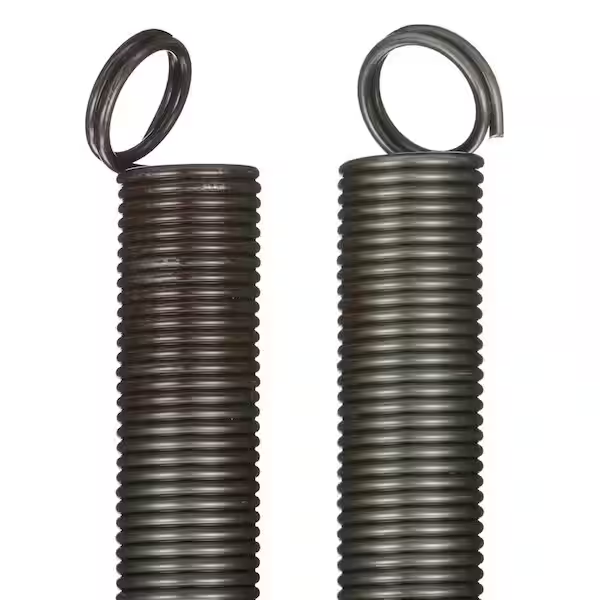
Extension Springs
Extension springs are typically used in older garage door systems and are mounted on either side of the door. These springs stretch and contract to generate force, lifting and lowering the door.
Advantages:
- Cost-Effective: Extension springs are generally less expensive than torsion springs, making them a budget-friendly option for homeowners.
- Ease of Installation: They are easier to install and adjust, which can be beneficial for DIY enthusiasts.
Applications:
- Lightweight Garage Doors: Extension springs are suitable for lightweight garage doors where the demand for the spring is less intense.
- Older Garage Door Systems: Many older homes still use extension spring systems, and they can be a direct replacement for these existing setups.
Differences and Applications:
Installation and Mechanism:
- Torsion Springs
Mounted above the door on a metal shaft, they use torque to lift the door. Their installation is more complex and typically requires professional assistance.
- Extension Springs
Mounted on either side of the door, they stretch and contract to lift the door. These springs are easier to install and adjust.
Performance:
- Torsion Springs
Provide a smoother and more balanced door movement, reducing stress on the door and its components. Ideal for heavy and frequently used doors.
- Extension Springs
This can cause the door to move unevenly if one spring breaks, potentially leading to more wear and tear on the door components. Suitable for lighter, less frequently used doors.
Safety:
- Torsion Springs
Considered safer as they are less likely to break catastrophically. When they do break, they stay on the shaft.
- Extension Springs
More prone to breaking and can cause significant damage or injury if they snap. Safety cables are often used to mitigate this risk.
Understanding the differences between torsion and extension springs helps you make an informed decision about which type is best suited for your garage door. If you need assistance in selecting or installing the right springs, our team of professionals is ready to help. Ensuring you have the correct springs installed will keep your garage door operating smoothly and safely.
Tools and Materials Needed
Replacing a garage door spring requires the right tools, materials, and safety gear to ensure the job is done efficiently and safely. Here’s a comprehensive list of everything you’ll need:
List of Tools
- Winding Bars: Essential for torsion springs, these bars are used to wind and unwind the springs safely.
- Clamps or Locking Pliers: These are used to secure the garage door in place while you work, preventing it from moving unexpectedly.
- Socket Wrench Set: Necessary for removing and tightening bolts and nuts.
- Adjustable Wrench: Useful for loosening and tightening various parts of the garage door assembly.
- Drill and Drill Bits: Required for any drilling needs, such as securing brackets or removing rivets.
- Tape Measure: Ensures accurate measurements for proper alignment and installation.
- Ladder: Provides access to high parts of the garage door system.
- File or Sandpaper: Used to smooth any rough edges or burrs on metal components.
- Hammer: Useful for tapping parts into place or removing nails.
- C-Clamps: Additional security to hold the door tracks in place.
List of Materials
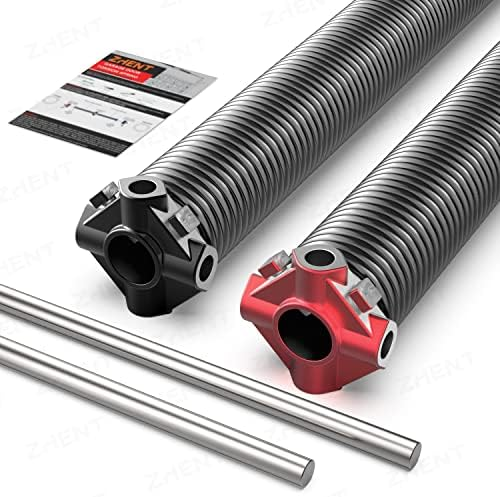
- Replacement Springs: Ensure you have the correct type and size (torsion or extension) specific to your garage door.
- Lubricant: High-quality garage door lubricant to reduce friction and ensure smooth operation.
- Steel Rods: For use with winding bars to safely wind and unwind torsion springs.
- Safety Cables: Particularly important for extension springs, these cables prevent the springs from causing damage or injury if they snap.
- Bolts, Nuts, and Washers: Replacement hardware to ensure all components are securely fastened.
- Brackets: Replacement brackets if the existing ones are damaged or worn.
Safety Gear
- Safety Glasses: Protect your eyes from debris, dust, and potential spring recoil.
- Gloves: Heavy-duty work gloves protect your hands from sharp edges and provide a better grip.
- Hard Hat: Protects your head from any falling objects or accidental bumps.
- Long Sleeves and Pants: Protect your skin from scrapes and cuts while working.
- Sturdy Footwear: Non-slip, steel-toed boots or shoes to protect your feet and provide good traction.
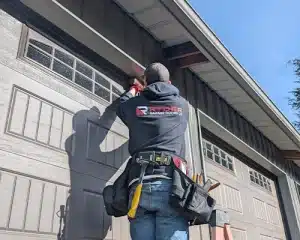
Having the right tools, materials, and safety gear is essential for a successful garage door spring replacement. By preparing adequately, you can ensure the job is done safely and effectively, minimizing the risk of injury and ensuring your garage door operates smoothly.
If at any point you feel uncertain or uncomfortable, don’t hesitate to contact a professional for assistance. Expert help ensures the job is done right and provides peace of mind that your garage door system is safe and reliable.
Safety Precautions
Importance of Safety When Handling Garage Door Springs
Garage door springs are under high tension, making them potentially dangerous if not handled correctly. Prioritizing safety is crucial to avoid serious injuries or accidents during the replacement process. Here are the key safety measures you should follow:
Detailed Safety Measures
- Disconnect the Power Supply
- Before starting any work, disconnect the power to the garage door opener. This prevents accidental activation of the door. Unplug the opener or switch off the circuit breaker.
- Before starting any work, disconnect the power to the garage door opener. This prevents accidental activation of the door. Unplug the opener or switch off the circuit breaker.
- Secure the Garage Door
- Use clamps or locking pliers to keep the garage door in place. Position the clamps on the tracks just below the roller to prevent the door from moving unexpectedly.
- Use clamps or locking pliers to keep the garage door in place. Position the clamps on the tracks just below the roller to prevent the door from moving unexpectedly.
- Use the Right Tools
- Ensure you have the correct tools, such as winding bars for torsion springs and safety cables for extension springs. Avoid using makeshift tools as they increase the risk of accidents.
- Ensure you have the correct tools, such as winding bars for torsion springs and safety cables for extension springs. Avoid using makeshift tools as they increase the risk of accidents.
- Wear Safety Gear
- Safety Glasses: Protect your eyes from debris.
- Gloves: Heavy-duty work gloves for hand protection and better grip.
- Hard Hat: Protects your head from falling objects.
- Long Sleeves and Pants: Shield your skin from scrapes.
- Sturdy Footwear: Non-slip, steel-toed boots or shoes for foot protection.
- Safety Glasses: Protect your eyes from debris.
- Follow Manufacturer Instructions
- Adhere to the specific instructions provided by the spring manufacturer. These instructions are designed for safety and proper spring installation.
- Adhere to the specific instructions provided by the spring manufacturer. These instructions are designed for safety and proper spring installation.
- Work in a Clean and Well-Lit Area
- Ensure your workspace is clutter-free and well-lit for better visibility and safety.
- Ensure your workspace is clutter-free and well-lit for better visibility and safety.
- Use Safety Cables with Extension Springs
- Install safety cables with extension springs. These cables contain the springs if they break, preventing injury or damage.
- Install safety cables with extension springs. These cables contain the springs if they break, preventing injury or damage.
- Inspect Springs and Hardware Before Starting
- Check the springs and related hardware for wear or damage before beginning the replacement. Replace any worn or damaged parts.
- Check the springs and related hardware for wear or damage before beginning the replacement. Replace any worn or damaged parts.
- Do Not Remove or Adjust Bolts and Nuts Under Tension
- Never adjust or remove bolts and nuts under tension without securing the spring first to avoid violent snapping.
- Never adjust or remove bolts and nuts under tension without securing the spring first to avoid violent snapping.
- Work with a Partner
- If possible, have someone assist you. A partner can help stabilize the door and provide additional safety oversight.
- If possible, have someone assist you. A partner can help stabilize the door and provide additional safety oversight.
By following these safety measures, you can minimize risks and ensure a safe garage door spring replacement process. If you feel unsure or uncomfortable at any point, contact a professional for assistance. Expert help guarantees safety and proper installation.
Read on for a step-by-step guide on replacing your garage door spring and maintaining your garage door system in top condition.
Step-by-Step Guide to Replacing a Garage Door Spring
Replacing a garage door spring is a task that requires precision and caution to ensure safety and effectiveness. Follow this detailed guide to complete the process safely. If you’re ever in doubt, consider reaching out to a professional.
Step 1: Disconnect the Power Supply
- Unplug the garage door opener from the power outlet. If it’s hardwired, switch off the circuit breaker that controls the opener.
- Verify the power is off by trying to operate the door with the wall switch or remote. The door should remain still.
Step 2: Secure the Garage Door
- Open the garage door fully and use clamps or locking pliers to hold it in place by positioning them below the bottom roller on each track.
- For additional security, place a sturdy ladder under the center of the door as a physical barrier.
Step 3: Remove the Old Spring
- Torsion Springs:
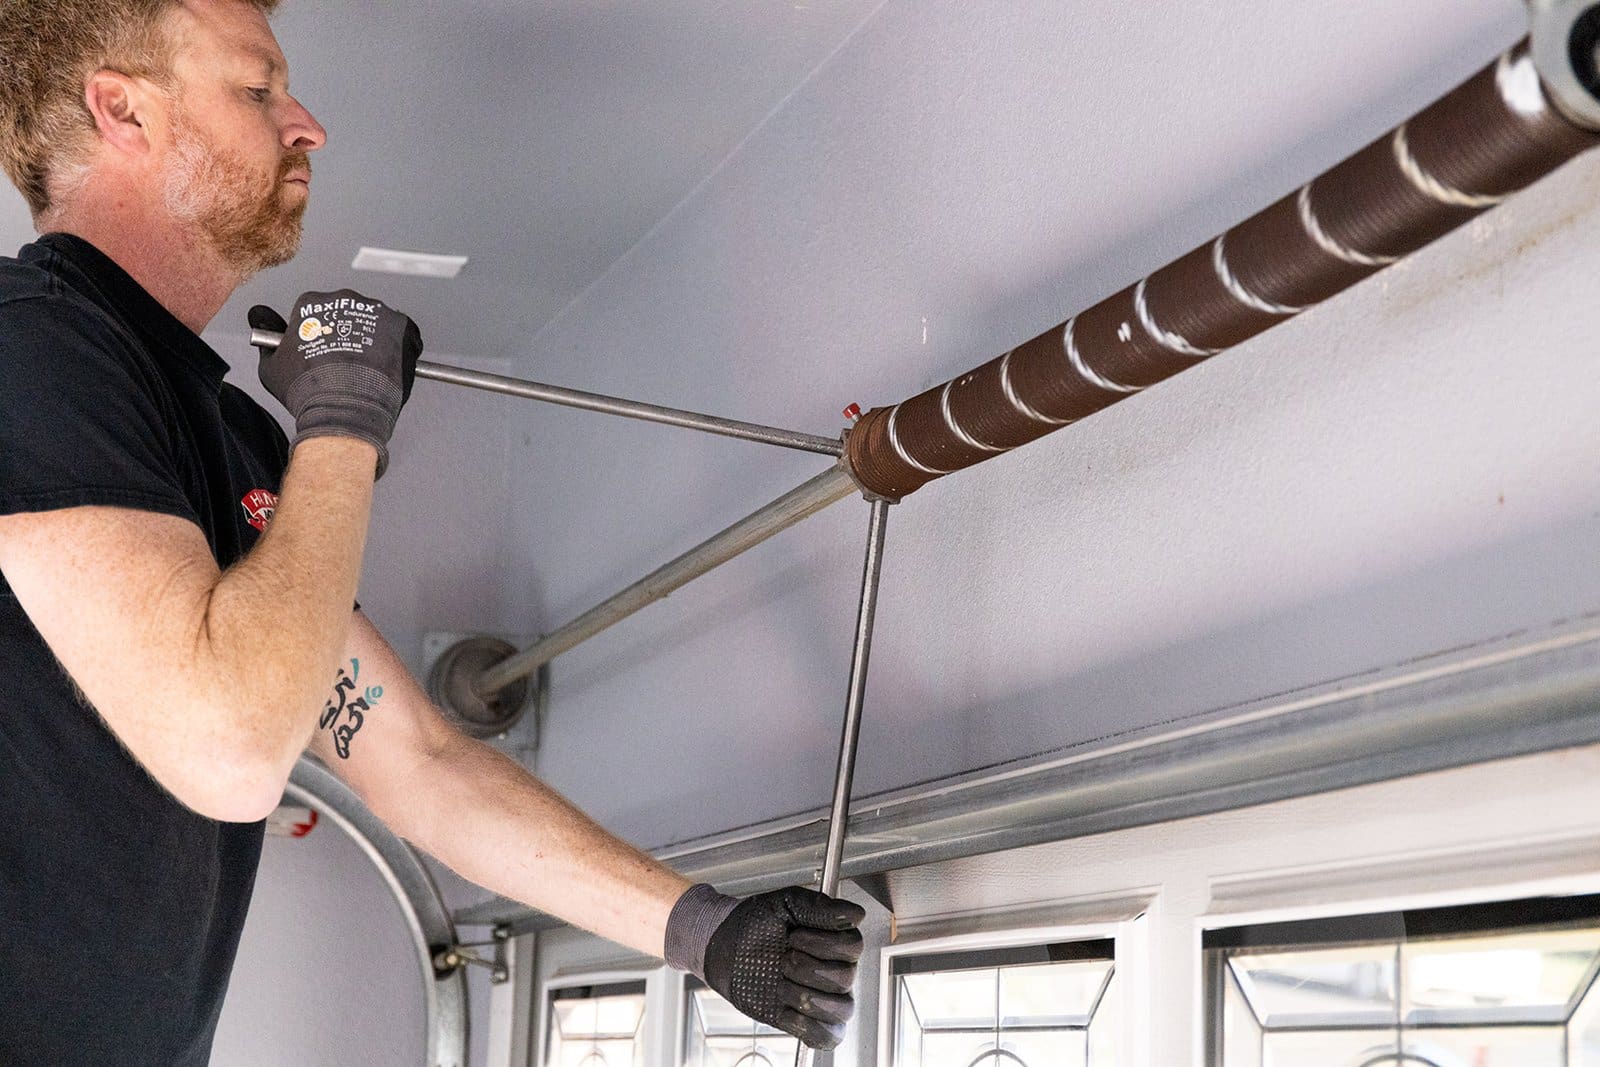
- Insert a winding bar into the winding cone and carefully loosen the set screws while firmly holding the winding bar.
- Slowly unwind the spring, using a second winding bar to move in small increments until the spring is fully tension-free.
- Remove the bolts securing the spring to the central bracket and slide the spring off the torsion bar.
- Insert a winding bar into the winding cone and carefully loosen the set screws while firmly holding the winding bar.
- Extension Springs:
- Lift the door to release tension and secure it in the open position with clamps.
- Disconnect the safety cable and the spring from the track hanger.
- Carefully detach the spring from its mounting points, ensuring all tension is released before removal.
- Lift the door to release tension and secure it in the open position with clamps.
Step 4: Install the New Spring
- Torsion Springs:
- Slide the new spring onto the torsion bar in the correct position.
- Secure the spring to the central bracket with the bolts.
- Wind the spring by inserting winding bars into the winding cone, following the manufacturer’s instructions for the correct number of turns.
- Tighten the set screws once the spring is wound to the proper tension.
- Slide the new spring onto the torsion bar in the correct position.
- Extension Springs:
- Attach the spring to the track hanger with the mounting hardware.
- Reconnect the safety cable through the center of the spring and anchor it securely.
- Adjust the spring tension according to the manufacturer’s guidelines to ensure the door is balanced.
- Attach the spring to the track hanger with the mounting hardware.
Step 5: Test the New Spring
- Remove the clamps or locking pliers from the tracks and lower the garage door slowly.
- Reconnect the power supply to the garage door opener.
- Operate the door with the wall switch or remote control, ensuring it opens and closes smoothly without any jerking or resistance.
- If the door isn’t balanced or moves unevenly, adjust the spring tension as needed.
Frequently Asked Questions on How to Replace a Spring on a Garage Door
Why is it important to know how to replace a spring on a garage door?
Understanding how to replace a spring on a garage door is crucial for maintaining the safety and efficiency of your garage door system. Properly functioning springs ensure that your garage door operates smoothly, preventing potential injuries and avoiding costly garage door repairs. By knowing this process, you can address issues promptly and keep your garage door in optimal condition.
What are the signs that a garage door spring needs replacing?
There are several common signs that indicate a garage door spring needs replacing:
- Difficulty Opening the Door: If the door is heavy or struggles to open, it may be due to a failing spring.
- Crooked Door: A door that appears uneven or crooked when opening or closing often signals a spring problem.
- Visible Gaps in the Spring: If you see gaps or separations in the spring, it’s a clear indication that the spring is broken or worn out.
Recognizing these signs early can prevent further damage and ensure timely maintenance.
Can I replace a garage door spring myself, or should I hire a professional?
While it is possible to replace a garage door spring yourself if you have the right tools and take proper precautions, it is generally recommended to hire a professional. Replacing garage door springs involves handling high-tension components, which can be dangerous if not done correctly. Professionals have the expertise and equipment to perform the job safely and precisely, reducing the risk of injury and ensuring the job is done right.
How often should garage door springs be replaced?
Garage door springs typically last about 7-9 years, depending on how frequently the door is used and the level of maintenance it receives. Regular inspection and maintenance can extend the lifespan of the springs. However, once they start showing signs of wear or damage, it’s important to replace them promptly to avoid malfunction and ensure the continued safe operation of your garage door.
What are the risks of not replacing a broken garage door spring?
Failing to replace a broken garage door spring can lead to several risks:
- Safety Hazards: A malfunctioning garage door can cause injuries if it suddenly falls or operates unpredictably.
- Further Damage: Continuing to use a door with a broken spring can strain other parts of the garage door system, leading to more extensive and costly repairs.
- Inconvenience: A broken spring can leave you unable to open or close your garage door, disrupting your daily routine and potentially compromising the security of your home.
Addressing a broken spring promptly helps maintain the safety and functionality of your garage door system.
Conclusion
Proper installation and maintenance of garage door springs are crucial for the long-term functionality and safety of your new garage door system. Springs play a key role in supporting the weight of the door and ensuring smooth operation. Neglecting their upkeep or installation can lead to safety hazards, reduced efficiency, and costly repairs.
Accurate installation is essential for balanced and smooth door movement. An improperly installed spring can cause the door to become unbalanced, leading to uneven operation and potential damage. Correct installation ensures the door operates reliably and safely.
Ensure your garage door remains in top condition with proper installation and regular maintenance.
End Note
At Ryder Garage Doors, we are dedicated to delivering outstanding garage door services tailored to your needs. Whether you need expert installation, dependable maintenance, or swift repairs, our team ensures your garage door operates seamlessly. Explore our Services and Gallery pages to discover our comprehensive range of services and witness the quality of our work.
We proudly serve a wide array of locations, bringing our top-notch services right to your community. Check out our Service Areas to see if we’re in your neighborhood. Learn more about our mission, values, and commitment to customer satisfaction on our About Us page.
Stay updated with the latest tips, trends, and insights on garage door repair and maintenance by following our blogs. Connect with us on Facebook and Instagram for real-time updates, customer reviews, and engaging content.
We’re here to meet all your garage door needs. Don’t hesitate to reach out through our Contact Us page. At Ryder Garage Doors, your satisfaction is our top priority. Contact us today and experience the difference!